Total Pageviews

Thursday, October 28, 2010

Pumpkin and ginger scones

If you like food as much as I do, then this time of year is a great chance to give your taste buds a workout. So many seasonal items are in abundance right now and none more so than the grandmaster of them all, the pumpkin!
I'm going to come right out and say it. Yes one of my choice coffee's would be Starbucks. Wait before I'm booed and pelted with rotten gourds I'm not attracted by the company and their alluring shops and I'm definitely not a latte frappe doppia kinda guy. I just like their strong fresh bold blends and also the pumpkin scones they push out at this time of year. Yes those scones which inspired me to make some today. I actually came across the original recipe for the Starbucks scones and then I adapted it by throwing in some chopped up pieces of candied ginger which I need to move out of the pantry. I just ate one and I was pleasantly surprised at how similar they actually were to the ones on sale. The only difference being the thickness of the frosting. Also don't be shy with the spices, I added some extra just because I like that fall flavor.

So here's the recipe adapted from Food.com,


2 cups all purpose flour
7 tablespoons sugar
1 tablespoon baking powder
1/2 teaspoon salt
1/2 teaspoon ground cinnamon
1/2 teaspoon ground nutmeg
1/4 teaspoon ground cloves
1/4 teaspoon ground ginger
6 tablespoons cold butter
1/2 cup canned pumpkin
3 tablespoons half-and-half
1 large egg
1/2 cup chopped candied ginger (if you like it)
Powdered Sugar Glaze
1 cup powdered sugar
1 tablespoon powdered sugar
2 tablespoons whole milk
Spiced Glaze
1 cup powdered sugar
3 tablespoons powdered sugar
2 tablespoons whole milk
1/4 teaspoon ground cinnamon
1/8 teaspoon ground nutmeg
1 pinch ginger
1 pinch ground cloves

 Preheat oven to 425 degrees F. Lightly oil a baking sheet or line with parchment paper.
3 Combine flour, sugar, baking powder, salt, and spices in a large bowl. Using a pastry knife, fork, or food processor, cut butter into the dry ingredients until mixture is crumbly and no chunks of butter are obvious. Set aside.
4 In a separate bowl, whisk together pumpkin, half and half, and egg. Fold wet ingredients into dry ingredients. Form the dough into a ball.
5 Pat out dough onto a lightly floured surface and form it into a 1-inch thick rectangle (about 9 inches long and 3 inches wide). Use a large knife or a pizza cutter to slice the dough twice through the width, making three equal portions. Cut those three slices diagonally so that you have 6 triangular slices of dough. Place on prepared baking sheet.
6 Bake for 14?16 minutes. Scones should begin to turn light brown. Place on wire rack to cool.


  • TO MAKE THE PLAIN GLAZE:.

  • Mix the powdered sugar and 2 tbsp milk together until smooth.

  • When scones are cool, use a brush to paint plain glaze over the top of each scone.

     AS THAT WHITE GLAZE FIRMS UP, MAKE THE SPICED ICING:.
    Combine the ingredient for the spiced icing together. Drizzle this thicker icing over each scone and allow the icing to dry before serving (at least 1 hour).


    Sunday, October 24, 2010

    Spelt and flaxseed bread

    This was made by using the same basic recipe for the no knead bread. I used spelt flour this time and added some flax seeds. It turned out well and tasted great. The lack of rising in the bread is due to spelt creating a tighter dough so the yeast gases cant expand the dough. Spelt has a higher protein count than wheat bread and is easier to digest, making it a good choice for people allergic to wheat. It does contain gluten though.


    Fall festival

    On Saturday we made our way over to the fall festival which was being held at Miller Children's Hospital. The festival was for the families and patients of the Endocrine Center, where Miranda receives her diabetes care. It was a whole lot of fun and Stephanie Stembridge done a great job organising and setting up the event.


    Miranda and Quinn with two of LBFD's finest

    
    Miranda meets Millie
    
    
    In her best Dorothy pose


    Tossing some rings with Ma Hudson
    
    
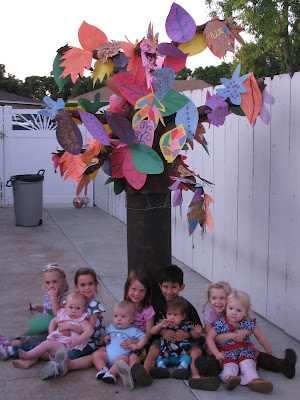
    With Dr Nagpala, her endocrinologist, wow look at that tree!!
    
    
    This is Stephanie who organised the day. The picture is a little blurry as Stephanie cant stand still for one second
    
    
    Puppy Quinn
    

    Monday, October 18, 2010

    You knead to..

    try this bread recipe. It's called no knead bread and it's been around for some time now. I have always wanted to try it, so I did. Everyone thinks bread is difficult to make and requires a lot of nurturing and special equipment. This might be if you wanted a nice sliced square loaf but if all you need is a rustic European type of bread then it's a whole different ballgame. You can be quite rough with it and have a more daring approach without expecting your venture to turn out like a rock. This recipe has only 4 ingredients but the most important one is completely free, it's called time. This bread takes almost 16 hours to make, wait!! don't scoff and mouse on over to the top right corner. To actually make the dough takes about 3 minutes and the rest of the time it rests until the last few hours before it hits the oven. I added fresh rosemary to the dough but the possibilities are endless, you could try adding olives or cheese with chile's, maybe some dried fruits and brown sugar and cinnamon, fresh herbs. The house smelled amazing and it was gone that night along with some great cheese and wine, perfect......

    The base recipe is courtesy of The Amateur Gourmet,

    3 cups all-purpose or bread flour
    1/4 teaspoon instant yeast (Trader Joes, 3 pack for 99cents and this will make about 75 loaves)
    1 1/4 teaspoons salt
    1.5 cups of water

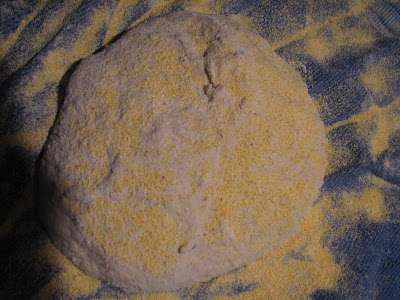
    Mix all the dry stuff into a large size bowl, it's going to rise and then add the water,semi warm and mix roughly with your hands. Cover and leave for at least 12 hours or more if you can. After that turn out the dough onto a well floured work surface and roughly turn into itself to form a ball, cover and let rest for 15 minutes. Spread a clean towel with cornmeal and sit the dough on top. More corn for the top of the dough and another towel to cover. Leave for another two hours. Mean while 30 minutes before the two hour mark, turn on the oven to 450 and put in your dutch oven/Pyrex/ceramic dish and lid and let it get hot in the last 30  minutes. I used the inside part of a crock pot which for me is ceramic. At 2 hours pull out the dish and plop the dough in, lid goes back on and in the oven for 30 minutes. Take of the lid and bake for another 20 - 30 minutes until nice and golden. Let it rest for at least 30 minutes and listen to it crackling and popping as it cools, then eat with some good cheese, butter or olive oil.


    After the first mix. The dough will be really sticky and seem like it's hard to manage,remember this bread is very rustic, don't worry!


     12 hours later, if the wrap looks like its going to explode, just prick a small hole in it to release the gas


     Ready for the towel


    Sunday, October 17, 2010

    On Friday...

    I had an appointment at the federal building in Santa Ana. It was a pretty special day for me as I arrived to be interviewed for my U.S citizenship. I was feeling nervous but not sure why, maybe it was the fact that all interviews are a little nerve wracking, had I studied enough to pass the politics and history test or was I just scared to lose the $700 it cost me to go through this unifying process? After all I didn't even need to be a citizen I could just keep myself on a green card status but without the few privileges which citizens share. I chose to become a citizen for a few reasons, when my children are older I don't want them to ask me why I never became naturalised, I don't think there is any valid answer other than laziness or procrastination, two traits I hope they never pick up. I would also like the family to be a unit, all for one and one for all. There are a few other simple reasons like not having to separate from each other when going through customs and of course bragging rights due to having two passports.
    Immigration offices are very interesting places I think, and looking around the waiting room on Friday really made me think of how much of a casserole this country really is. There were nationalities of all kinds, INS officers were calling people by names I would have absolutely no idea how to pronounce but to them it looked like just another day at the office. I was finally called on time which was astounding, and made my way to a small office where I proceeded to tell the truth, the whole truth and not much else. They say it can take up to two hours for this appointment to be completed. After a few verification questions it was time for the test. I had studied a lot and they can ask you 10 questions from a choice of 100, you must get 6 correct or you fail. Well the officer fired those first 6 questions and I fired the answers right back at her all correct. Next was the reading and writing test which didn't phase me, been doing that for some time now so if I failed this part something serious was wrong. The interview ended with a "Congratulations I am approving you for citizenship" I did it and all it took was around 20 minutes. Now I have to wait for my swearing in ceremony instructions and it will all be done.
    Due to security I couldn't take any pictures of this day so please enjoy these below
    Also here are the six questions I was asked, how good is your American politics and history, answers at the foot of the post.

    When was the Declaration of Independence drawn up?
    Name one of the longest river in America?
    Who is the Speaker of the House?
    Who lived here before the settlers?
    How long is a Presidential term?
    What do we call the first 10 amendments of The Constitution?

     Swearing in, I doubt mine will be as cool as this.


    Tuesday, October 12, 2010

    Trees a Crowd

    Recently we were asked by a good friend, Stephanie Stembridge, the family advocate for Miller Children's Hospital here in Long Beach to help with a project to celebrate the hospitals fall festival. Some of you may remember this is where Miranda first received her treatment when diagnosed with diabetes. We had a choice of painting some signs or making two trees. Well Maura decided to choose the tree option and little did we know at the time how much of a brain twister this was going to turn into. You can see below the steps I took to make the tree and then Maura, who could make a party happen in the space station rallied some friends who helped us put the finishing touches by making the leaves which would be glued to the branches. The kids and Brian had a great time creating their own designs.

    Many thanks to these amazing families,

    The Weems
    The Wilson's
    The Gallagher's
    The Summers


     The trunk started out as a cylinder for holding concrete to set painted brown. I placed a tomato cage on top to build the branch section and also making it a two piece structure for easier transportation.


     The roots were made from rolled up craft paper.


    I used chicken wire to form the branches.


    After all the wire branches were made I wrapped them in more brown craft paper. The lower part of the trunk still has to be wrapped in paper to make a more traditional looking trunk.


    Ready to have the leaves attached.


     Claire with a great looking offering.


     Finn taking a well earned break for some food.


    Erris loved the noodles


    The production line is in full swing now


    Sorry, I'm done I only build I don't decorate


    Future tree builders


    At last, one of the finished trees. Great job guys!!

    Friday, October 8, 2010

    Bananadrama.

    Miranda asked  me for a snack today. Hmm let me see what we have. Look here, what about a banana? She looked at the banana and then looked at me. Her face was a picture of disbelief. I tried to tell her that the banana was at its ripest and would taste really good. This didn't work so I thought about what I could do with the fruit instead of throwing it in the trash. Banana muffins for Saturdays breakfast sounded good so the deal was sealed.
    I threw in some walnuts just because lately Miranda has been eating them like they were going out of fashion and bananas love walnuts. You could even use some apples, pears or press a dollop of peanut butter in the middle before they hit the oven, maybe with some good chocolate chips.

    13/4 cups all p flour
    3tsp b powder
    1.5 tsp cinnamon
    dash of nutmeg
    1/3 cup ground almonds
    1/3 cup brown sugar
    2-3 large ripe bananas
    2 eggs
    2 tbsp oil
    1/2 cup milk
    3 tbsp honey/agave

    Sift flour, b powder and cinnamon into a bowl. Stir in nutmeg, sugar and almonds.
    Mash bananas in another bowl and add eggs, oil, milk, and honey.
    Add to dry ingredients and stir until complete.
    Spoon into muffin  trays and bake in a 375 oven for around 20 minutes or until springy.

    Serve warm with knobs of butter and some more honey/agave.


    Sunday, October 3, 2010

    California Dreaming

    This past Saturday I had a small win from the California Super lotto so on Sunday I hurried on over to a car show being held at The Los Altos Methodist Church. Ever since I have been able to drive I have always steered towards the older cars owning many back home in Scotland and whilst watching my friends buy newer and more reliable cars, I always stuck with the pre 1975's which would either never start or needed major work done to them. Now here I am living in the land of the true muscle car and temptation is worse than a monkey working in a banana factory.

    I wasn't able to buy anything at the show, first of all no one was selling and did I mention how much my winning ticket was? It was $11.
    What, I said it was a small win didn't I? Here are some pictures of the cars I was salivating over.